Dr Andrew Weil’s Curried Cauliflower Soup Recipe (Dr. Oz)

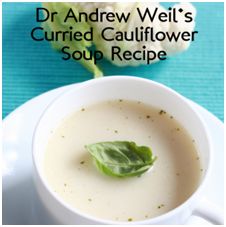
Full of antioxidants and a “True Foods” creation, Dr Andrew Weil gives us his recipe for curried cauliflower soup. He said it includes foods from all five categories on his anti-inflammatory diet.

Dr Andrew Weil’s online recipe was modified as follows:

Ingredients

  • 1/3 cup raw cashews (Use blender / Chopper)
  • 3/4 cup water or Vegetable broth
  • 3 tsp extra virgin olive oil
  • 1 medium onion, diced sautéed
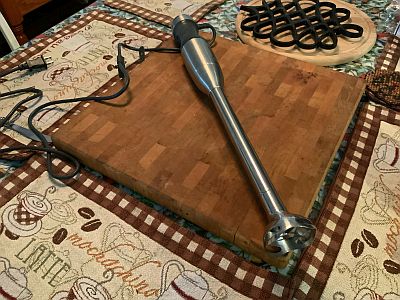
  • 1 large head cauliflower, cut into 1-inch pieces (use submersible blender)
  • 1 14-oz can light Coconut milk
  • 2 tbsp Curry powder
  • 1 tsp ground Turmeric
  • 1 tsp ground Cumin
  • 1 tsp evaporated can sugar
  • 1/4 tsp ground Cinnamon
  • 1/4 cup chopped fresh cilantro
  • Unsalted butter to sauté onion
  • Sea Salt for flavor

Add when ready to serve

  • Chopped carrots
  • Chopped Celery
  • Chopped Green onion (Scallion Onion)

Direction:

  • sauté onion
  • Use blender for raw cashews add some coconut milk at this time
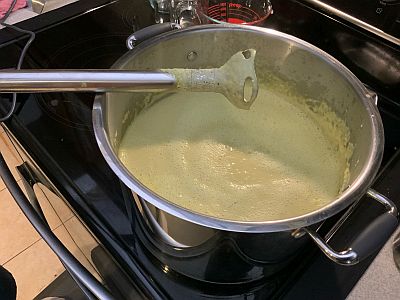
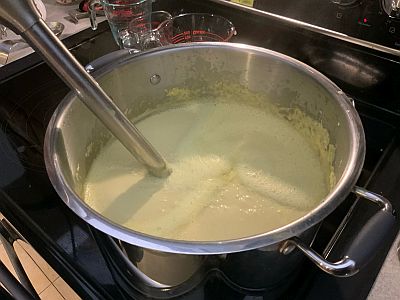
  • Add cauliflower, coconut milk, blended cashews, spices and salt as needed
  • Place all in large pan, cover all with rest of coconut milk, water or vegetable broth
  • Bing to a low boil and cook for at least 10 min
  • Use submersible blender to mix thoroughly.

Now if you do not have a submersible blender, any blender will do. I would just assume that all households that have the needed kitchen appliances have the submersible blender, or those that are now getting married include on their wish list of items for wedding gifts..  Note the blender used by most will have to be filled with a boiling hot soup (as one needs to bring the cauliflower soup to a boil for 10 min) just to cook the cauliflower.. I used a potato masher prior to using the submersible blender just to break up the cauliflower heads.  The taste is great, and one can barley tells there is any spice at all added.  I encourage all try as it is very healthy, and it makes a great lunch soup..  

submersible blender

Continue to Making Fire Cider at Home

I have been using fire cider for more than 5 years, especially during almost 2 years long pandemic.  Here is the recipe: http://www.mommypotamus.com/fire-cider-recipe/

Also, there are some notes as addition of our 2016 posting, http://www.jnlyman.com/blog/2016/04/15/fire-cider-home-made-natural-remedy/

* I did not use onion, lemon and rosemary which float on top of the vinegar and may create an issue of spoilage.  So I used more turmeric and ginger root.

* Since I did not use fermenting weight to hold down the veggies, I put hot peppers first, then garlic, turmeric and ginger to prevent light veggies floating.

* Shake once a day to prevent spoilage

Enjoy

Making Eggplant Parmesan

Ingredients

  • 2 large eggplants (note, over ripe eggplant has a lot of seeds)
  • 1 tablespoon extra virgin olive oil to sauté onion
  • minced garlic according to taste
  • make your own special receipt sauce, we use crushed tomatoes, diced tomatoes, chili and chive diced tomatoes, and tomato paste along with onion, oregano pepper and a dash of sugar.
  • Freshly ground black pepper
  • sufficient breadcrumbs for dredging
  • 1 1/4 cups grated parmesan cheese, divided between layers and top
  • all-purpose flour as needed
  • 6 large eggs, beaten (more if needed) for dredging process
  • 1/4 cup extra virgin olive oil for top of eggplant slices prior to baking.

Direction

Make your sauce:

Sauté onion and garlic in olive oil.  Then add tomato ingredients according to desired taste.

Grated  parmesan cheese (fresh):

Prepare eggplants:

Peel the eggplants leaving the stem on so you can hold easily when ready to slice with mandolin. Slice the eggplants with mandolin and then place the sliced eggplants in water to keep moist prior to dredging step.

Dredge the eggplant in flour, egg, and breadcrumbs (set up dishes ahead of time for preparation).

After the dredging process, and the slices are on the parchment paper, drizzle a little oil over the top of each piece prior to placing in oven for 17 min. at 360 degrees F. Take out , turn and place in oven for an additional 17 min.

Spread the 1/4 tomato sauce over the bottom of casserole dish, sprinkle with grated cheese, then place the first layer of eggplant round covering the sauce on the bottom of the dish. Repeat the process for two additional layers finishing by placing the remaining sauce on the top.  Note, there should not be more than three layers. Sprinkle the remaining grated cheese on top and place in a 350 degree F oven for 35 to 40 min.

Final results of baking process, and set aside for a minimum of 30 min prior to eating.

You can tell when done as sides break away slightly and the cheese is melted.  Also you may notice some boiling of the sauce on the sides while in oven.

Making a Concrete Slab for a Portable Generator

Use the standard 2×4 framing lumber to make a wood frame.  To make the job easier, the slab was poured in two sections.  Also, a slight slant to the frame was done so the water would drain away from the house during our famous rainy season. The start was to put some gravel on the bottom to not only level the landscape but also to use less mortar.  The total job took 15 50 # bags as each bag made approximately 1/3 rd cubic ft.  The slab size is 6′ x 3′ x 3.5″.  Emptying a 50# bag into a mixing tub, adding water, and mixing with a mortar hoe is all it took.

Smoothing out the top was a matter of using a mortar trowel.

Prior to pouring the mortar, two anchors were placed  to allow  the generator to be chained down and locked which prevents theft.  Generators if not locked down in place seem to grow legs and walk in Florida during our wonder annual hurricane season.

After removing the wood framing, a belt sander was used to smooth out the edges.  Using a belt sander prior to the mortar being completely cured makes the job easier.

Now the slab is ready.  A week to cure should provide more than sufficient strength to hold generator and whatever else can be placed on the slab.

Watching Another Night Flower, Epiphyllum Oxypetalum Bloom, September 29, 2020

We received a cutting of another species of Epiphyllum, Epiphyllum Oxypetalum last year, June 2019.  As a totally surprise, we observed couple of buds on Sep. 24, 2020. Yesterday, Sep. 29, 2020.  We finally believed that one of buds was going to open.  You could see that the bud changed orientation and size.  So exciding!!  Wow, it only took 15 months to have buds and 5 days to bloom although I stayed up three nights in a row so I would not miss the actual blooming.  At 4:45 pm, Sep 20, 2020, we could see outer reddish tepals bend outward a little more.  Green color of stems were getting less green and more toward the white side.  We also noticed that the tip of the buds were getting a fussy look,  see as follows:

So far, primary stems were up to 50″ long.  Opps, the longest stem was just broke as it got too heavy with leaves.  Oh well.  Secondary stems were flat, approximately 23″ x 4″.  The flower was slower to open and quicker to close maybe because of size and weight.  We were able to captured the moment though along with color and movement. Stamens as male part are white / yellowish and soft, and female pistil with white stigma on top and white long tube.  It is spectacular.

Oct. 25, one more Epiphyllum Oxypetalum started opening early at 8:31 pm and then last photo of the day was taken at 10:02 pm for the day as follows:

Watching More Night Flowers Bloom

Wow, We had another opportunity to take time-lapse video of Epiphyllum Hookeri, night flower bloom.  Two flower buds are so close to each other and ready to bloom the same night.  I had no clue which flower bud was going to open first.  As usual, the bud size was getting bigger and color was changing from green to white / pink quickly.    We were so excited to watch and record it again, especially during this difficult time of pandemic.  

This time, one flowers was opened 11:07 pm and the other opened after that. I missed the beginning of first blooming by just a minute but, second one was perfect.  

Blood Moon, Lunar Eclipse (total), January 20-21, 2019

I have never seen a blood moon before. So I was concerned about missing any important moment. I saw the big orange color moon with beautiful sunset and took some photos of the moon around 6:15pm, Sunday, January 20, 2019

Partial Eclipse started 10:33pm. This is a photo taken at 11:10pm.  It was interesting to see some blue and purple color around the edge of the moon.  It was amazing, and  it was not hard to take photos at this time because the moon was bright and quite large.

Total Eclipse started at 11:41 pm.  I did not take any photo until 11:50 pm when it started to turn red at low corner and slowly spread up.  Wow, it was beautiful. By the way, this  was a cold night by Florida standards as It was 46 degree F.  Now with the moon straight  up, a small, and dark red glow was visible. This photo was taken at 12:39 am, Monday.  Good thing I had sleeping cart along with a blankets and pillow on the back lawn or it would have even more difficult to capture this lifetime event! 

This Photo was taken at 12:55am.  Total Eclipse was finished.  I was done.

Based on meteorologist, the partial Eclipse was suppose to begin at 10:33pm and end at 1:50 am, Monday, Jan. 21. Total Eclipse starts at 11:41pm and ends at 12:43 am, Monday, Jan. 2019 https://www.timeanddate.com/eclipse/in/usa/tampa

Next chance to see this type of event will be 2021 AD.  I may not be around at that point in time to capture the lifetime event.

UNESCO World Heritage Site, Pisa, Italy

We planned to see learning tower in Pisa, Italy for years as you never know when it will finally topple over.  When we finally stood there to take photos, we realized how little we really knew about the tower and world heritage site.

It took us more than 20 minutes to walk to the site with a tour guide.  The bus could not park close to the site because there is no space for parking.

Piazza Del Duomo started construction in 1064 by building Cathedral dedicated to Santa Maria Assunta. Then baptistery construction began in 1152.  The construction of bell tower did not begin until1173 and took 177 years to complete. Well, unfortunately the tower was built at a unstable foundation.  The tower has been learning forward to south, stopping and learning again.

Because of the sheer number of people visiting the site, it was somewhat of a challenge to take a great picture without someone getting in front of the camera or standing taking their pictures.


Hurricane Irma arrived late, left a mess, and shut off the power!

When we heard that Hurricane Irma was shifting from direct hit on the east coast to west coast, we learned that we are now actually on the wrong side of the storm.  At that point we started to install hurricane shutters on west side of the house which we did not do for Hurricane Wilma, 2005.

It took almost one week to prepare for Hurricane Irma, removing lose objects, filling containers for drinking water, filling gas (car and containers), and securing some of  the trees.

So, Hurricane Irma made first landfall in Cudjoe Key, September 10, 9:10 am as Category 4 and then made second landfall in Marco Island, 3:42 pm as Category 3.  We lost power for 16 hours starting Sunday night at 10:20 pm, September 10.
 It was windy but we knew that Port St. Lucie would only have 50-70 mph wind, enough to knock out the services.  We started a generator early Monday morning to support refrigerators, Wi-Fi, TV and RV in case we need AC in RV.

The cleanup efforts took the entire day on Monday, cutting and removing falling down trees, standing up and tying up the trees we may be able to save, cleaning the mess at back yard which is Westside of the house. Now I understand why being on east side of the storm is bad situation.

The crop of Banana trees were pretty much taken out as we lost about 12 of them.

When I was wondering how long it would take to get the power back to the house, one FPL truck drove by so I waved him down.  “We lost power” I said. The driver smiled at me and said:” Everybody lost power” I was so happy to see the truck.  I knew that they were working hard to get power back to all of us.  Before the storm, all kind of utility trucks from Michigan, Texas already arrived in Port St. Lucie and ready to go to work knowing that this would be not only good for the power company, the customers, and more money in their pockets with all the overtime they would be putting in. 


Making a Working Bench for the Garage

I needed a new work bench for the garage. The bench was made with ¾“plywood and 2”x4”x6’ boards.  The 2”x4” boards were glued together and then cut to around 30” in length for the legs.  A dado blade was use to cut a ¾” slots into the legs to allow the plywood to slide into.  This type of construction provides sufficient support to the shelves to allow the shelves to hold the heaviest of tools.  The top of the bench was made from 4 each 2”x4”x6’ pieces of lumber glued together then screwed to ensure strength.  Because the lumber was not perfectly flat, a piece of ½” plywood was added to the bottom.  6 pocket holes were drilled into the 2”x4” pieces at the top of the base to allow the actual bench top to be secured to the base.  Note a slot was provided at the top of the base that would end up between the actual bench top and the base. This area provides sufficient space for the long wood clamps to be stored.  The total cost of construction was slightly more than $100.00 as most of the cost was in the purchase of the plywood. 

Obviously, I was in need of a shelf above the bench so after staining and securing the material all matched and ended up very functional.